5 Tips for Virtualizing Microsoft Active Directory
Not all server workloads are suitable candidates for virtualization. But with some careful planning and understanding of the technical implications, Microsoft Active Directory domain controllers (DCs) can be virtualized to reduce costs.
1. Start with Good Planning
There’s little point in adding extra domain controllers to Active Directory if they are all virtualized on the same host server. For the sake of fault tolerance, make sure that your DCs are not all sharing the same disk spindle, network card, host virtualization server and uninterruptable power supply (UPS).
Many organizations feel more comfortable keeping at least one physical DC in each domain, usually the server holding the Primary Domain Controller (PDC) emulator role, although it’s not a requirement. If you choose to virtualize DCs, make sure that physical resources on the host virtualization server are sufficient for handling the expected load. DCs running the PDC emulator role and global catalog servers supporting Exchange are usually the most heavily loaded.
To ensure that your DCs start up as quickly as possible if they need to be rebooted, configure the virtual network adapter’s primary DNS server to point to a DNS server that’s running on a physical device different from the host virtualization server. The host server’s network adapter should also be set to use an off-box DNS server.
2. Set Up a Domain Controller in a Virtual Machine
You can use the standard DCPROMO method for promoting a server to a domain controller running in a VM. If the VM is intended to replace a DC running on physical hardware, make sure that the physical DC has been demoted and that full AD replication has occurred before running DCPROMO in the VM. Then you can use the machine name from the demoted physical DC in the VM.
Most hardware virtualization systems include physical to virtual (P2V) migration tools; while there are some free options, the only supported tool for Hyper-V comes with System Center Virtual Machine Manager (SCVMM). The P2V tool has two conversion modes: With online conversion, the source and target servers run at the same time during the conversion process; with the offline mode, the source machine is shut down before restoration is finished on the target device. Offline mode is the only supported method for migrating DCs and is recommended to avoid USN rollback in Active Directory. (See “Backup,” below, for more information on USN rollback.)
3. Synchronize the Time on All Participating Domain Members
The Kerberos protocol is used for authentication in Active Directory, and Kerberos tickets are issued to security principals with a time stamp and short lifespan to prevent brute force attacks against the directory. For successful authentication, the clocks on all participating domain members, including domain controllers, must be synchronized. The domain controller hosting the PDC emulator role sits at the top of a hierarchy that provides time synchronization services throughout the domain.
By default, Hyper-V VMs have their time synchronized with the clock on the host server. To replicate the VM configuration as closely as possible to the physical world, it’s important when configuring VMs for domain controllers and member servers to turn off time sync with the host server and leave ADs time synchronization service to do its job.
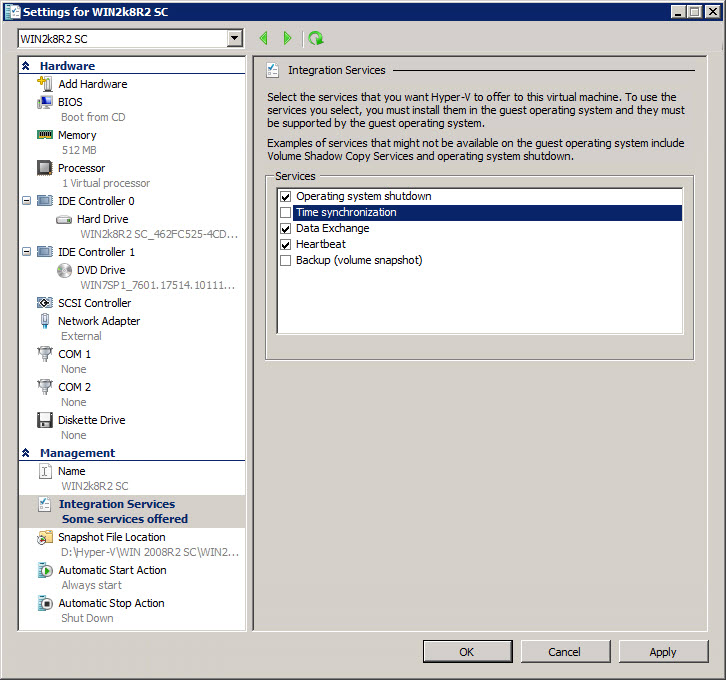
To disable time synchronization on VMs in Hyper-V, open Hyper-V Manager from Administrative Tools on the Start menu, right-click the required VM in the central pane and select Settings from the menu. In the Settings dialog, expand Management in the left pane, and select Integration Services. In the right pane, uncheck Time synchronization (Figure 1) and click OK.

4. Stick to Backup Best Practices
While it may be tempting to use the snapshot feature in Hyper-V for backup purposes, you must adhere to best practices from the physical world and take daily System State backups from at least two DCs in each domain. Rolling back a DC using the Hyper-V snapshot functionality results in inconsistences in the AD database caused by Update Sequence Number (USN) rollback, where DCs think they have an up-to-date copy of AD and replication fails without reporting any errors. Starting in Windows Server 2003 SP1, USN rollback can be detected and AD replication automatically stopped, though you shouldn’t rely on this mechanism.
5. Be Selective When Using Virtualized Features
There are some handy things you can do with a VM that aren’t possible in the physical world — and some you should avoid. As mentioned, snapshots shouldn’t be used on VMs hosting domain controllers. Another feature best avoided is the pause functionality; if you must use it, make sure it’s only for a short period. Again, you’ll run into replication and database inconsistency issues if DCs are paused for a long time.
To get your domain controllers up and running as fast as possible if the virtual host must be rebooted, configure VMs running DCs to start up at the same time as the host server. You can configure other VMs not running domain controllers on the same virtual host with a delayed start-up time to ensure your DCs get priority and are started in time. This should ensure that the rest of the dependent infrastructure doesn’t fail.
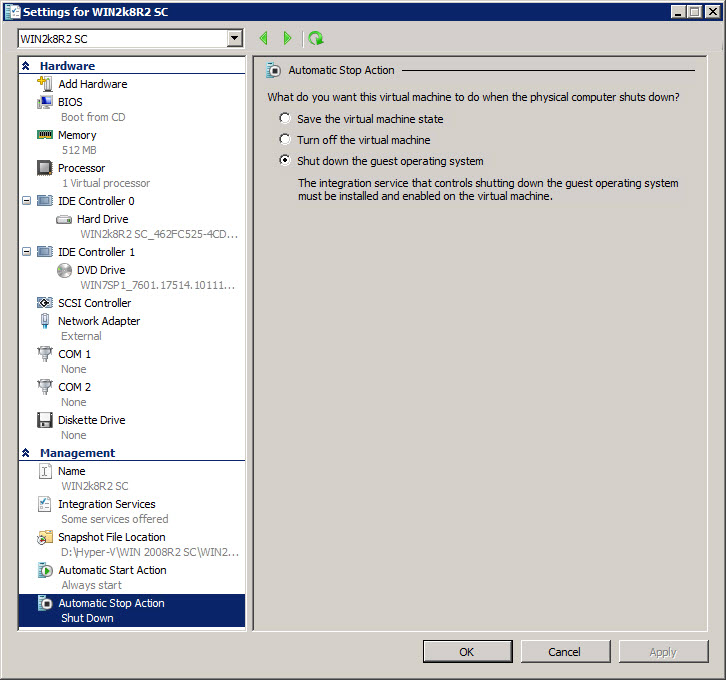
Finally, the default Shutdown action in Hyper-V can save the VM state when the host server shuts down. For domain controllers, this setting should be changed to Shut down the guest operating system. To change the shutdown setting for a VM, open Hyper-V Manager from Administrative Tools on the Start menu, right click the required VM in the central pane and select Settings from the menu. In the Settings dialog, expand Management in the left pane and select Automatic Stop Action. Then change the configuration on the right as shown in Figure 2.


